Advanced Timing Parameters
Find out more about the advanced controls you can use to perfectly synchronise your speech and sound design
Ordinarily by using our audio eco-system we automatically arrange all of your audio assets into different tracks and mix these using various AI mixing tools. For most use cases this will be sufficient for producing high-quality audio assets, however should you need more control over this process then read on!
Concepts
Before we can get into the details of our mastering engine, we need to establish some ground concepts. Firstly some keywords:
- Script - Content describing the number and ordering of sections as well as their content.
- Section - A grouping containing text-to-speech, media (user uploaded), and audio fx assets.
- Sub-section - A sub section within a section, that can only contain text-to-speech assets.
- Mastering Engine - A software service for joining together different audio assets and improving the sound quality.
- Timeline - A representation of the ordering of different audio assets (tracks and clips)
- Track - the vertical ordering of sound, i.e. the result of the process is the sound track mixed with the voice track.
- Clip - A single audio asset positioned horizontally on a track.
Section
A section is defined during script creation and is used in both/tts and /mastering requests.
For example in the below script we have only one section named 'main'.
<as:section name="main" soundsegment="main">
    hello this is section 1
</as:section>
Each section should have a unique name, and sections are ordered iteratively (top-down). In the above example, section main also has the soundSegment field set. This will be used by mastering to decide which sound segment (i.e. which part of the sound template file) will be mixed with the text-to-speech content in this section.
No valid soundSegment leads to client error. Empty soundSegment means no sound template for the section.
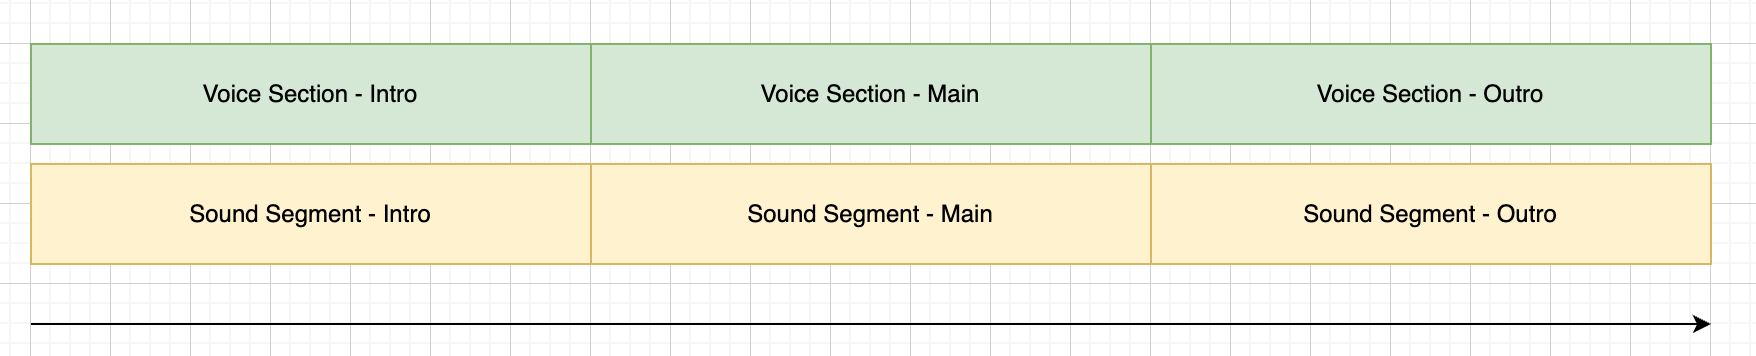
For most applications you would likely create more than one section. For example in the below script we have 3 sections, each section has a different name and uses a different soundSegment.
<as:section name="intro" soundSegment="intro">
		Hello
</as:section>

<as:section name="main" soundSegment="main">
		the weather is nice today!
</as:section>

<as:section name="outro" soundSegment="outro">
		goodbye!
</as:section>
In this example section 'intro' will play first followed by 'main' and 'outro'. This can be visualised as follows (not to scale).
Sub-sections
A section can also contain multiple sub-sections and additional audio content. This is useful if you wish to use multiple speakers (tts voices) in a single section. For example, both 'outropart1' and 'outropart2' will be read using a different voice. The soundSegment 'outro' will play across both sections.
<as:section name="outro" soundSegment="outro">
    <as:sub name="outropart1"> Hello outro part 1 </as:sub>
    <as:sub name="outropart2"> Hello outro part 2 </as:sub>
</as:section>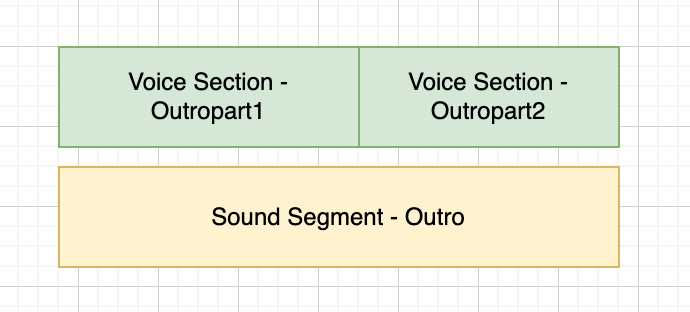
Hidden sub-sections
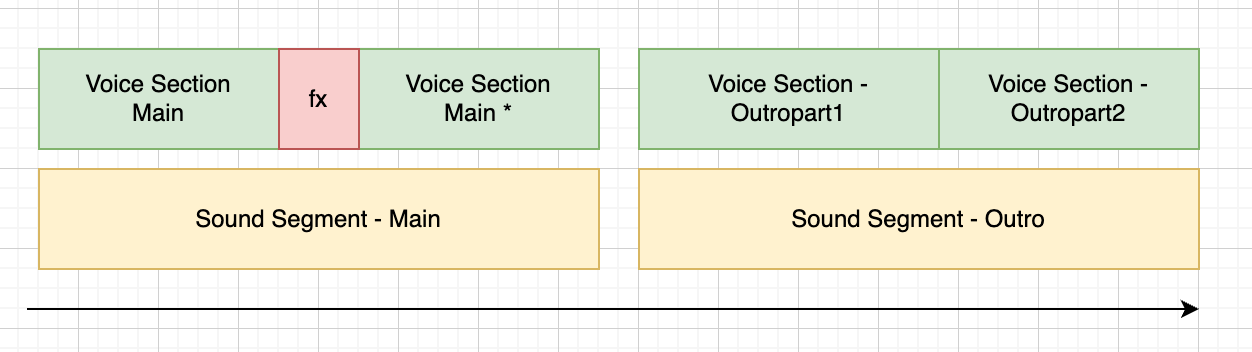
The following script contains 1 main section in 'main', and 2 sub-sections in 'outro'.
<as:section name="main" soundSegment="main">
    This content will be read before the fx is played.
    <as:fx id="risersmall"/>
    this content will be read after the fx has finished playing.
</as:section>


<as:section name="outro" soundSegment="outro">
    <as:sub name="outropart1"> Hello outro part 1 </as:sub>
    <as:sub name="outropart2"> Hello outro part 2 </as:sub>
</as:section>
However, anytime an as:fx or as:media tag is used in a section any content around it will be placed into a sub-sections behind the scenes, in this case resulting in 3 sub-sections. This is so your fx/media files can be placed exactly by the mastering engine. This details should not present any problems but will result in additional speech files being generated.
Ordering
The ordering and length of your resultant masted audio file is dependent on a few variables. These are (per section):
Length of any tts files
- The length of a given tts file will depend on the speed of the speaker, break tags, and any effects that have been applied.
- Different providers place different amounts of silence before and after the requested tts content also.
The length of any fx and media files
The sound template that is being used
- Elastic audio templates will often make sections slightly larger than they need to be (more on this later)
In general the mastering engine will layout these audio elements for you and should not require user input. However..
Use Cases
There are a number of use cases that might require you to be exact about the timing of these different elements. For example:
- Syncing up text-to-speech with video;
- Ensuring your audio file fits within a given total length (i.e. 30 second advert); or,
- Leaving more natural and longer pauses between sections.
There are a few different features you can combine to suit these use cases.
Timeline properties
The timeline properties parameter is a 'dict' that specifies various parameters that control the overall positioning of the timeline.
{
"forceLength" : "<time in seconds that the resultant file will be>",
"speechStart" : "<time in seconds that the speech track will start>",
"soundTail" : "<time in seconds that the sound template track will play at the end>",
"fadeIn" : "<time in seconds>",
"fadeOut" : "<time in seconds>",
"padding" : "<time in seconds that is added between each script section>"
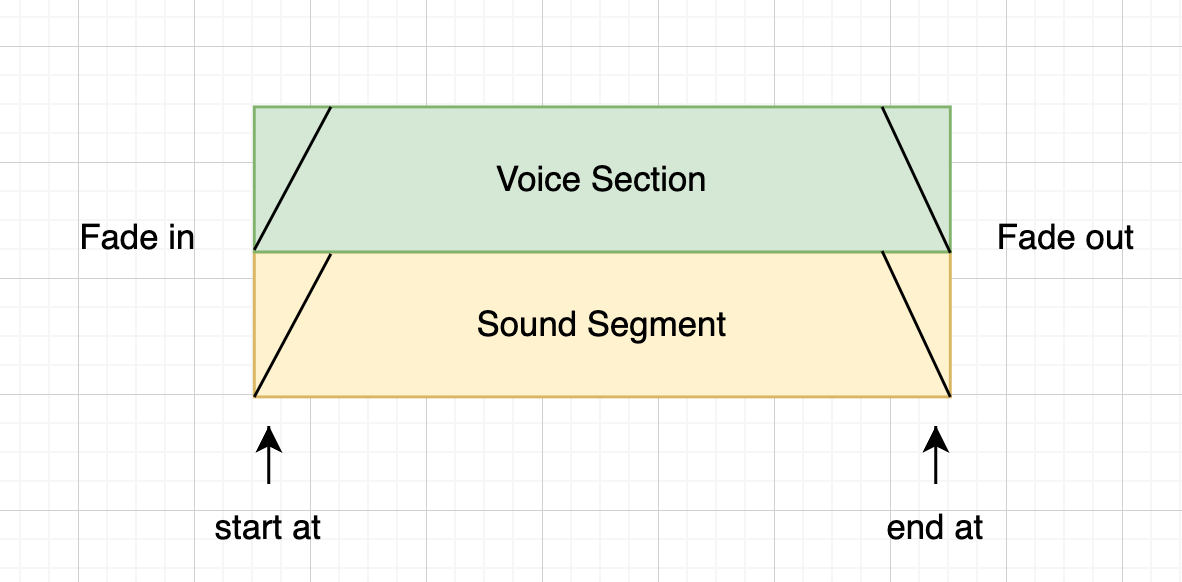
}By default the following rules are applied:
- start the first non-sound-template asset 1 second after starting the sound template
- continue to play the sound template asset for 3 seconds following the last non-sound-template asset
- Apply a 1 second fade in/out to the file.
- Apply no padding.
Visually this can be show as:
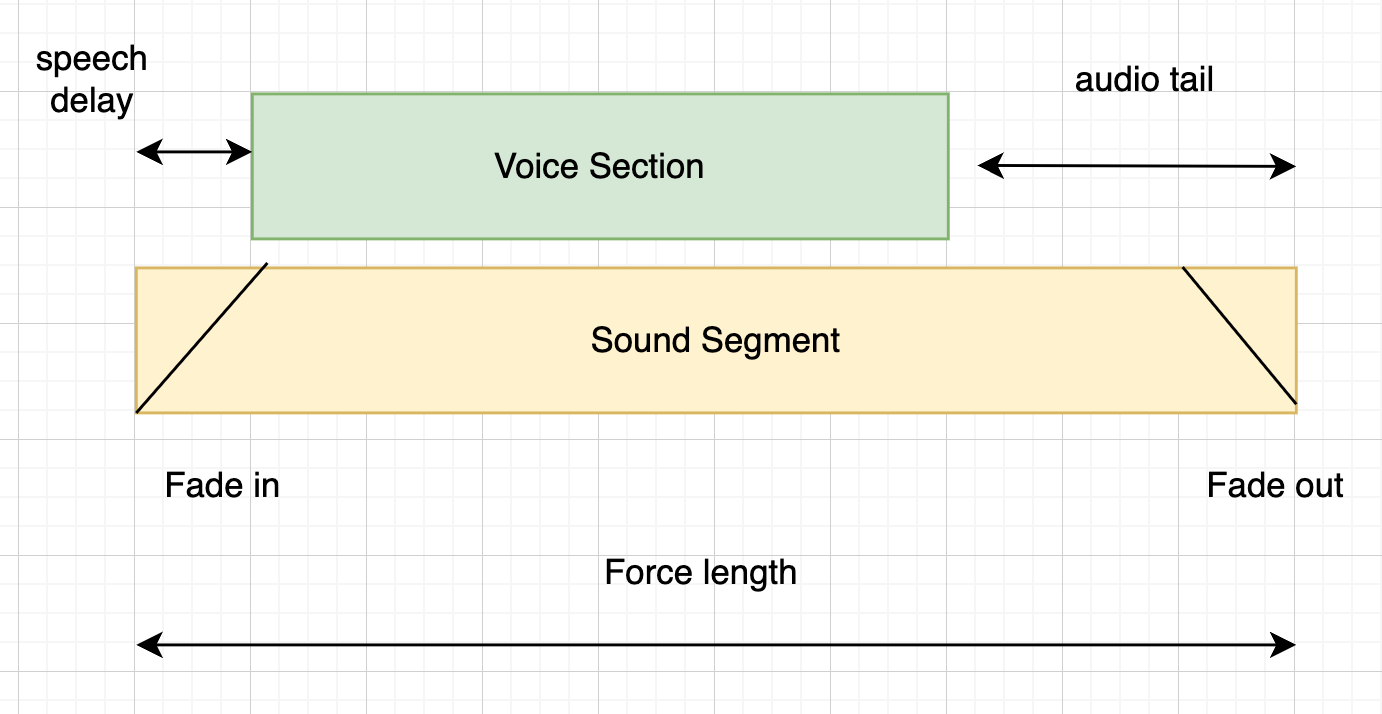
This example assumes that there is only 1 section to process.
Force Length
Force length will force the resultant mastered audio file to be exactly a given length. Assets that are shorter than the the supplied value will be rounded up (with the sound template filling in the gap). Assets that are too long are cut down to size.
Section Properties
Section properties define various parameters for a given (named) section.
{
    "<sectionName>" : {
        "startAt" : "<time in seconds>",
        "endAt" : "<time in seconds>",
        "alignment" : "<left, centre or right>",
        "fadeIn" : "<time in seconds>",
        "fadeOut" : "<time in seconds>",
        "startPadding" : "<time in seconds that is added before this script section>",
        "endPadding" : "<time in seconds that is added after this script section>"
    }
}
These values can be visualised like so (with the exception of alignment)
In insolation setting the values of a single section (when the script has only one section) is redundant. It is therefore easier to explain this when multiple sections are present.
Code Example
Consider the following script:
<as:section name="intro" soundSegment="intro">
		Hello and welcome to the audiostack SDK
</as:section>

<as:section name="main" soundSegment="main">
		It's quite cool I must say!
</as:section>

<as:section name="outro" soundSegment="outro">
		Speak soon.
</as:section>
The resultant mastered audio file can be visualised as follows (assuming the default timeline properties)

Time runs left-right
Force Length
Lets now assume we set each section to have a length of 10 seconds using the following /sectionParameters:
{
    "intro" : {"endAt" : 10},
    "main" : {"endAt" : 20},
    "outro" : {"endAt" : 30}
}
Would result in the following (not to scale):

Be careful when setting endAt/startAt values
Setting the length of a section to be less than what the section requires to fully play (i.e. intro to be 5.1 seconds) will result in an client error being raised.
Also setting a section to startAt in the middle of a previous section is also not permitted.
Alignment
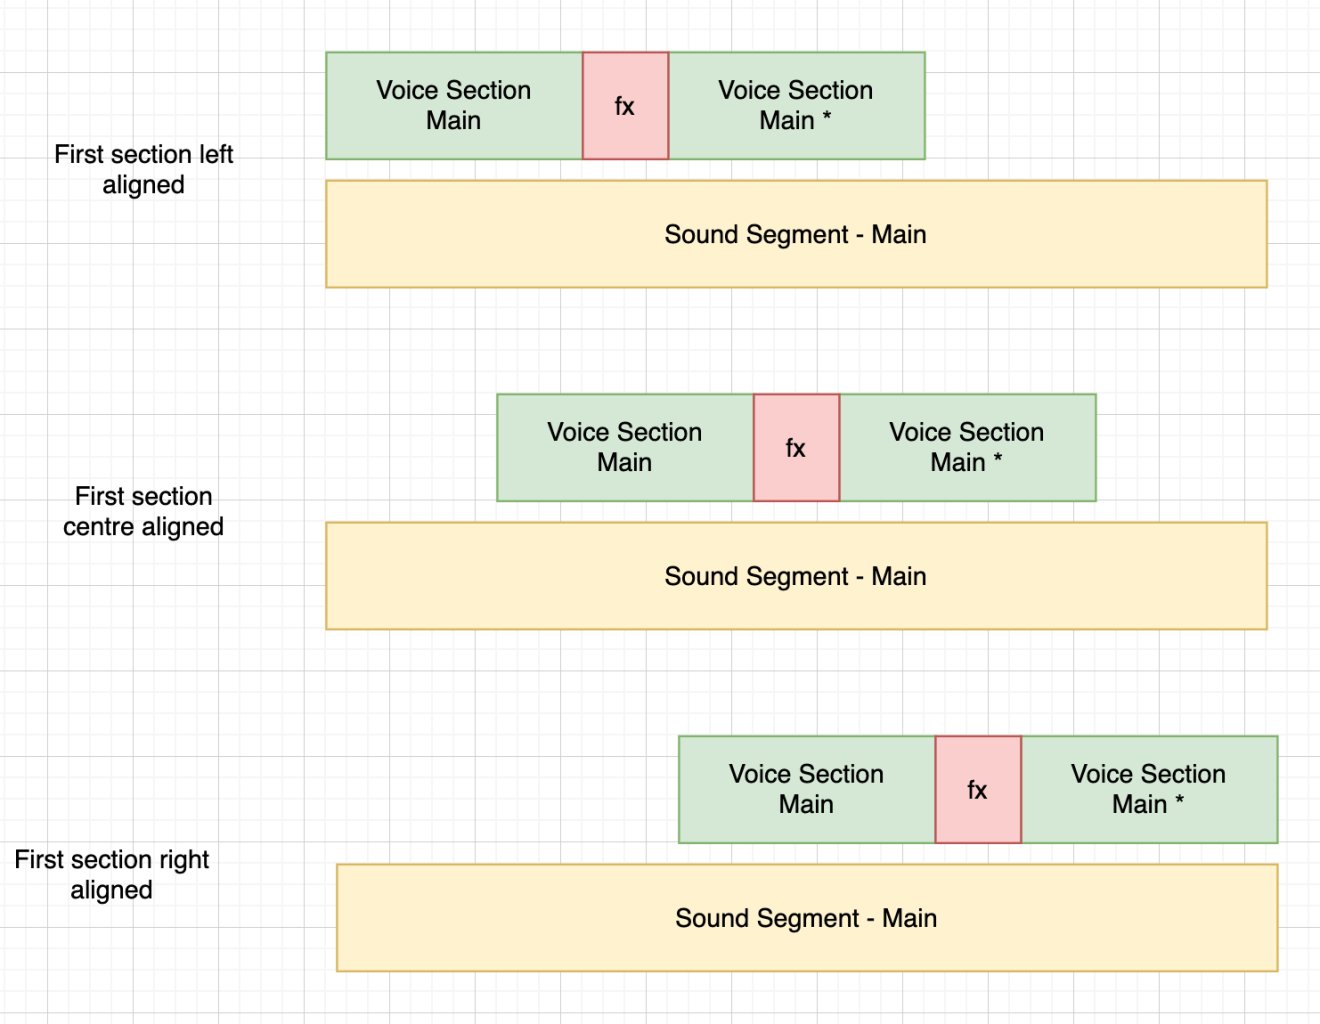
In the case we have excessive resultant space we can use the alignment parameter to move the sections around with their defined 'space'. For example:
{
    "intro" : {"endAt" : 10, "alignment" : "right"},
    "main" : {"endAt" : 20, "alignment" : "left"},
    "outro" : {"endAt" : 30, "alignment" : "centre"}
}
Results in:

- left: (default) audio assets always start as soon as the section does
- right: audio assets will finish so the end of the audio file is at the end of the section
- centre: audio assets will be placed in the middle of the section.
Sub-sections
If your script contains sub-sections all the sub-sections are treated as a single group. i.e. the first sub-section's /startAtis defined by the parameters set. All the proceeding sub-sections will follow iteratively (with no gap)
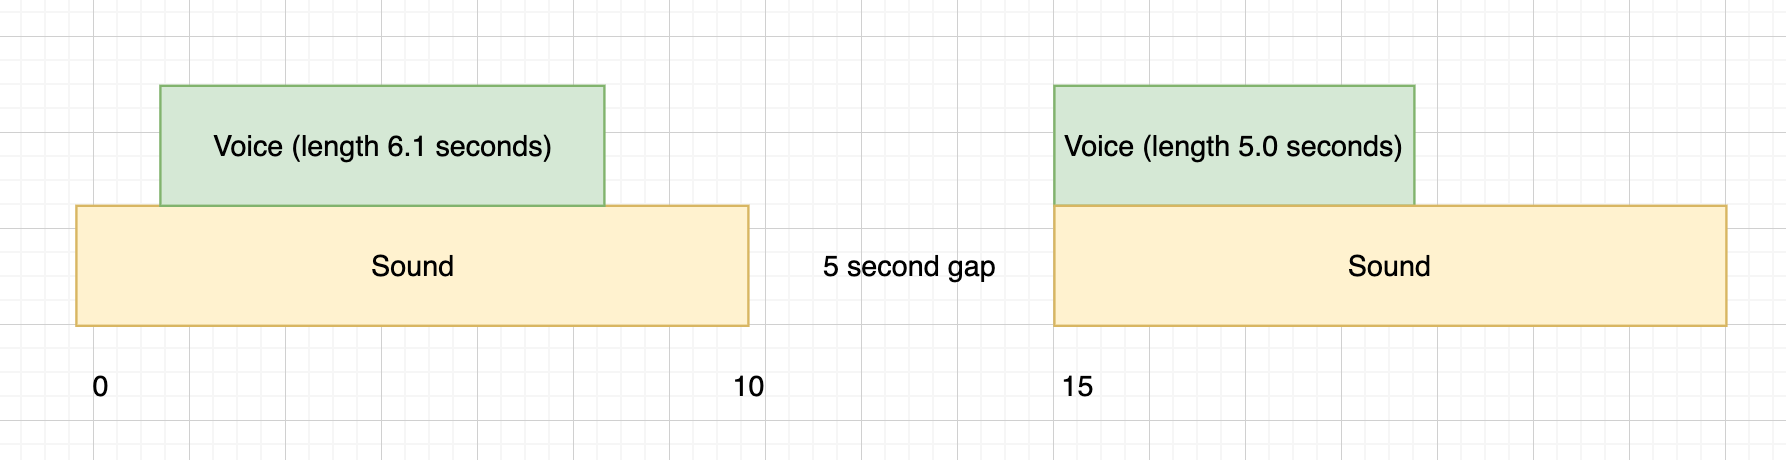
Inserting Gaps
Should you wish to insert a gap between sections you can specify one like this:
{
    "intro" : {"endAt" : 10},
    "main" : {"startAt" : 15}
}
This would result in the following (not to scale):
Padding
Adding padding to a section increases its length, this has the same effect as adding a breaktag either before or after the section.
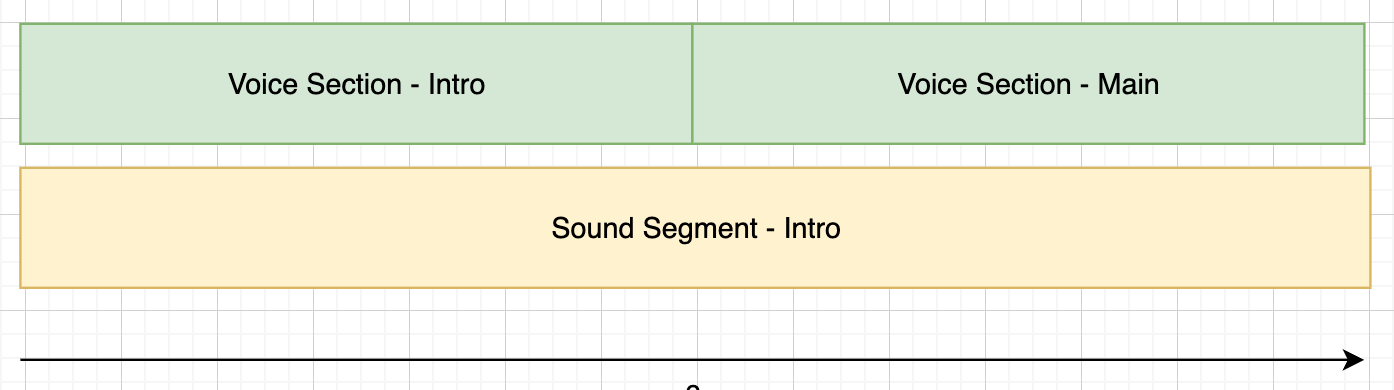
Sharing Sound Segments
Although its not possible to set the timing information of a sub-section directly, it is possible to achieve a similar effect by having more sections and sharing the sound segment across them. To achieve this simply set the following section's soundSegment to be equal to *, (this can be repeated for multiple sections also).
<as:section name="intro" soundSegment="intro">
		Hello and welcome to the audiostack SDK
</as:section>

<as:section name="main" soundSegment="*">
		Its quite cool I must say!
</as:section>
This will result in the following:
Elastic vs Non-Elastic Sound Templates
We currently offer two types of sound template in our eco-system, elastic and non-elastic templates. Most of our sound templates are elastic, as these are more flexible for generating audio of different durations.
| Elastic Templates | Non-Elastic Templates |
|---|---|
| Faster to process | Slower to process |
| Provide better transition effects between sections | Use cross fades to create transitions |
| Can fill any length of audio | Finite in length |
| Can be problematic when the length of a section is user defined | Work better when the length of a section is user defined |
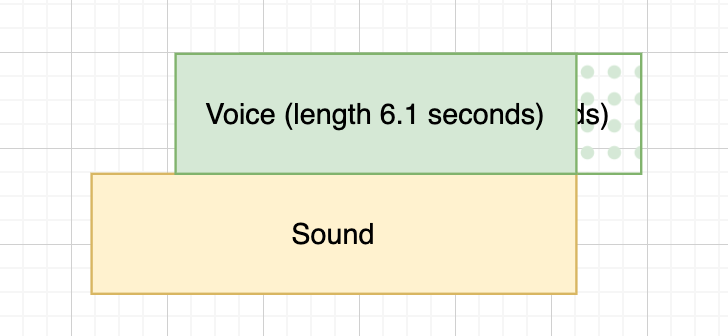
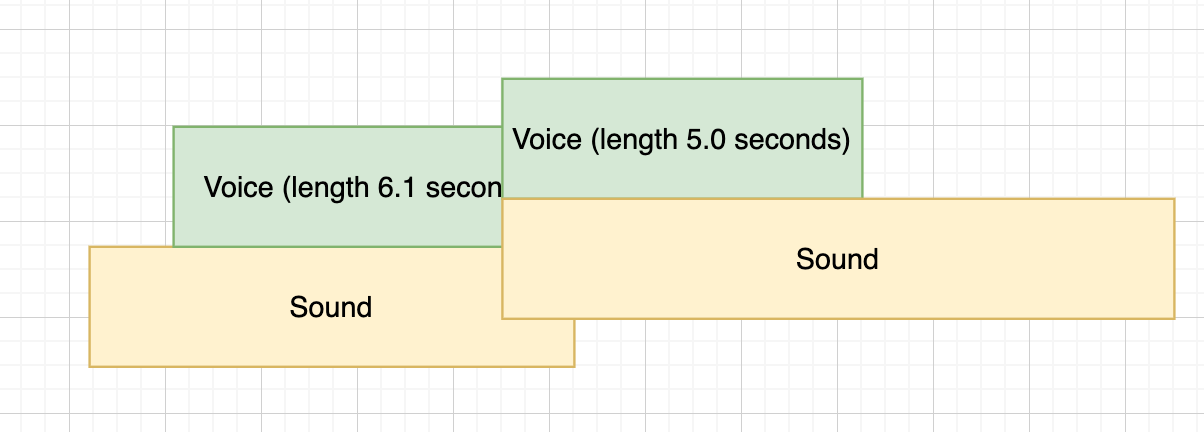
To visualise the resultant effect of setting the length of the first section of a given script, vs letting the engine decide this on behalf of the user, can be shown below:

Visualisation of how different sound templates are created.
Updated 2 months ago
This is complicated stuff, so we've put together an example use case with copy-and-paste code examples for you to try...