How to Clone any Voice
There are multiple options available for cloning your voice using AudioStack API, depending on your needs.
With AudioStack API, you can access a bigger range of voice cloning options, enabling you to get the right quality for your usecase.
When you clone a voice, you will create a custom voice that will be available for use in the Audiostack API (only to the user that created the voice). To do this, you may use any files uploaded within your organisation.
How can I upload my files for cloning?
There are different options available for uploading your files, depending on whether you're integrating with the API, uploading the files as a developer, or offering voice cloning to people who would prefer to record using AudioStack's simple recording workflow in the Platform:
Which type of cloning should I use?
Instant Cloning
If you want to clone a voice instantly or just with a little data, use voice_engine_3. Here, you can create a clone with just a few minutes of recordings (although the quality will improve with more data).
300 credits will be charged upon successful voice creation.
Professional Cloning
Professional Voice Cloning (PVC) is the process that allows for the creation of a hyper-realistic voice model almost indistinguishable from the original voice. It will retain the accent, nuance, and timbre of the original voice to the maximum.
Just like with Instant Voice Cloning (IVC), input equals output: the resulting voice will only be as good as the recordings you submit. Before you proceed, please read out Best Practices documentation here.
In order to create a PVC,** a minimum of 30 minutes is required,** but closer to **3 hours of clear raw audio **will yield the most accurate results. With less than the recommended amount, the quality of the resulting clone may be compromised.
You can use PVC to create a synthetic voice in the following languages: Chinese, Korean, Dutch, Turkish, Swedish, Indonesian, Filipino, Japanese, Ukrainian, Greek, Czech, Finnish, Romanian, Russian, Danish, Bulgarian, Malay, Slovak, Croatian, Classic Arabic, Tamil, English, Polish, German, Spanish, French, Italian, Hindi, Portuguese, Hungarian, Vietnamese and Norwegian.
Warning:While the AI can speak any supported language, cloning a voice in a non-native language may result in accents and mispronunciations. For example, cloning an English-speaking voice and using it to speak Spanish will likely produce a Spanish voice with an English accent.
Usually, the turnaround time for English is 2 working days after submission of the data, and for any other language in the list , 3-4 working days after the submission of the data.
The cost of a PVC will depend on the language, amount of data and the concierge nature of the request.
🔨 How to create a Professional Voice Clone
🤝 CONSENT
Consenting to creating a clone is a very important step that requires careful handling from both parties. At AudioStack we are taking this very seriously, and will never trigger the training of any synthetic voice until our detailed Consent and Privacy Documents are signed (Terms of Service, Privacy Policy, Acceptable Use)
🎤 CREATE A PVC VIA PLATFORM (Existing users and Invited New Users)
If you want to invite an external contractor to record a professional voice, you can do so easily via our Platform using the Voice Manager. Please note, your account will need to be granted admin permissions by another admin or the organization owner to access this page.
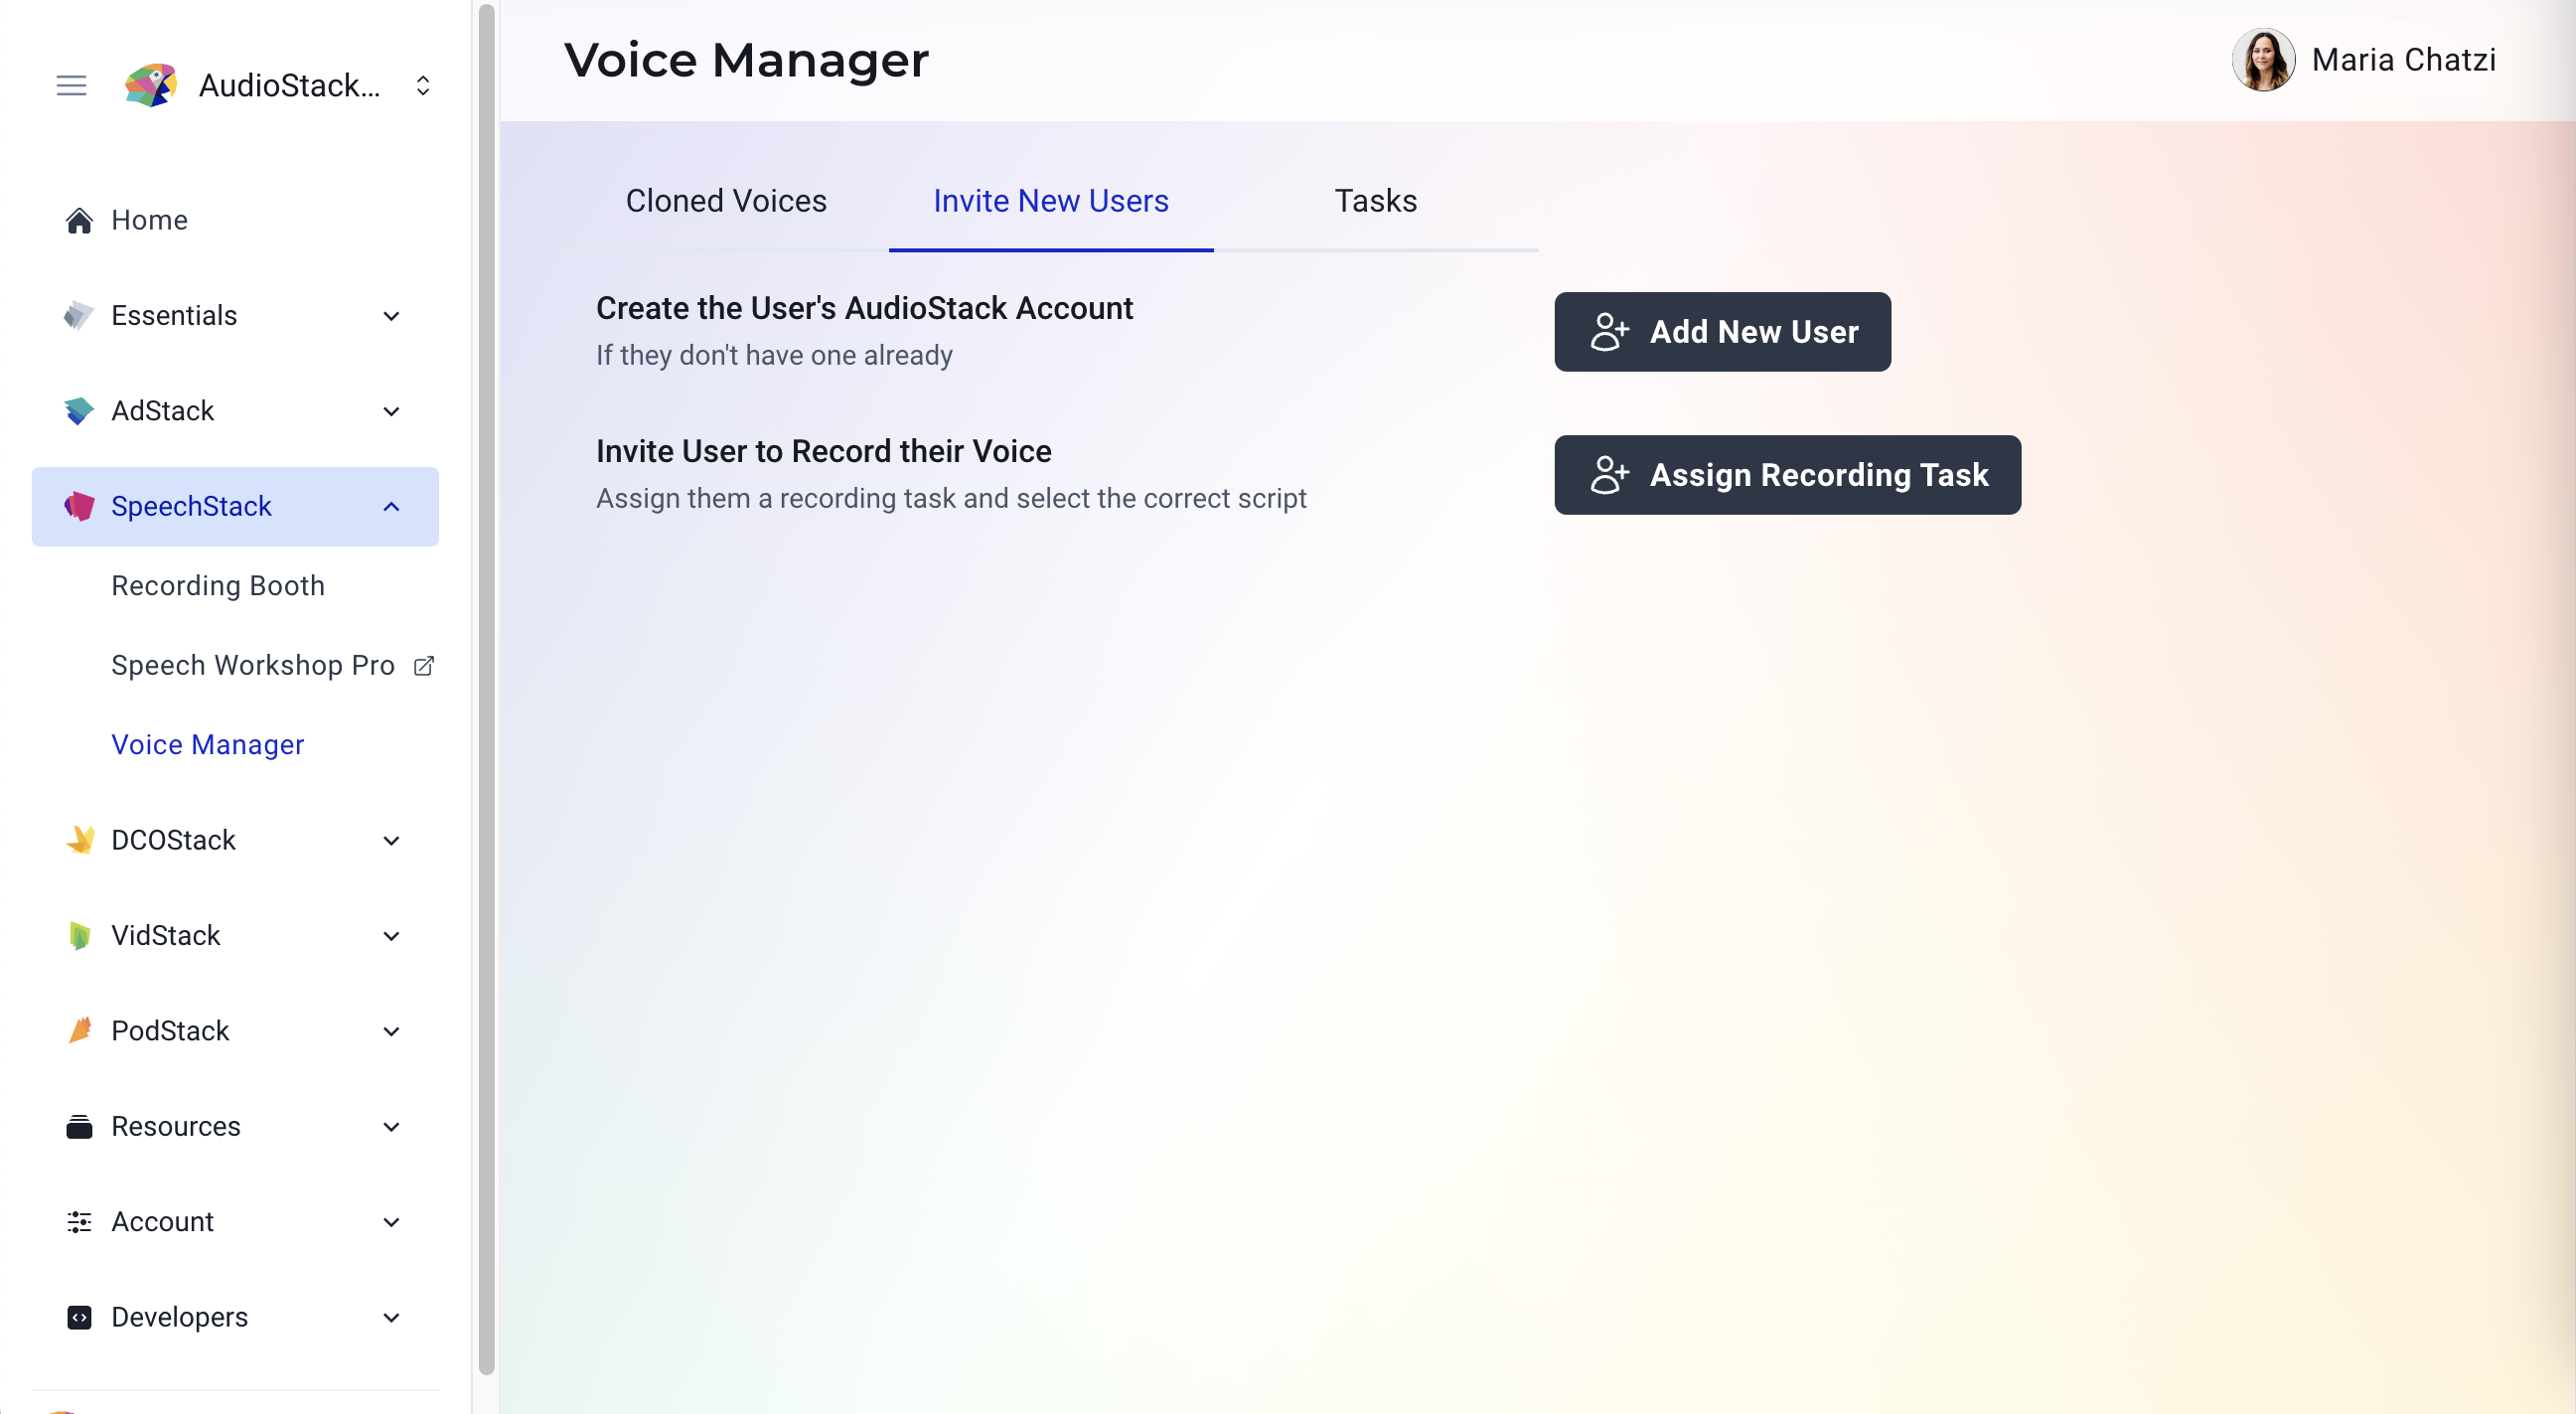
From the navigation, choose Setup/Voice Manager. To invite someone to record their voice, click on the Invite New Users tab and then Assign Recording Task. The invited user will receive an email where they can create their account and will only see the Recording Booth Workflow.

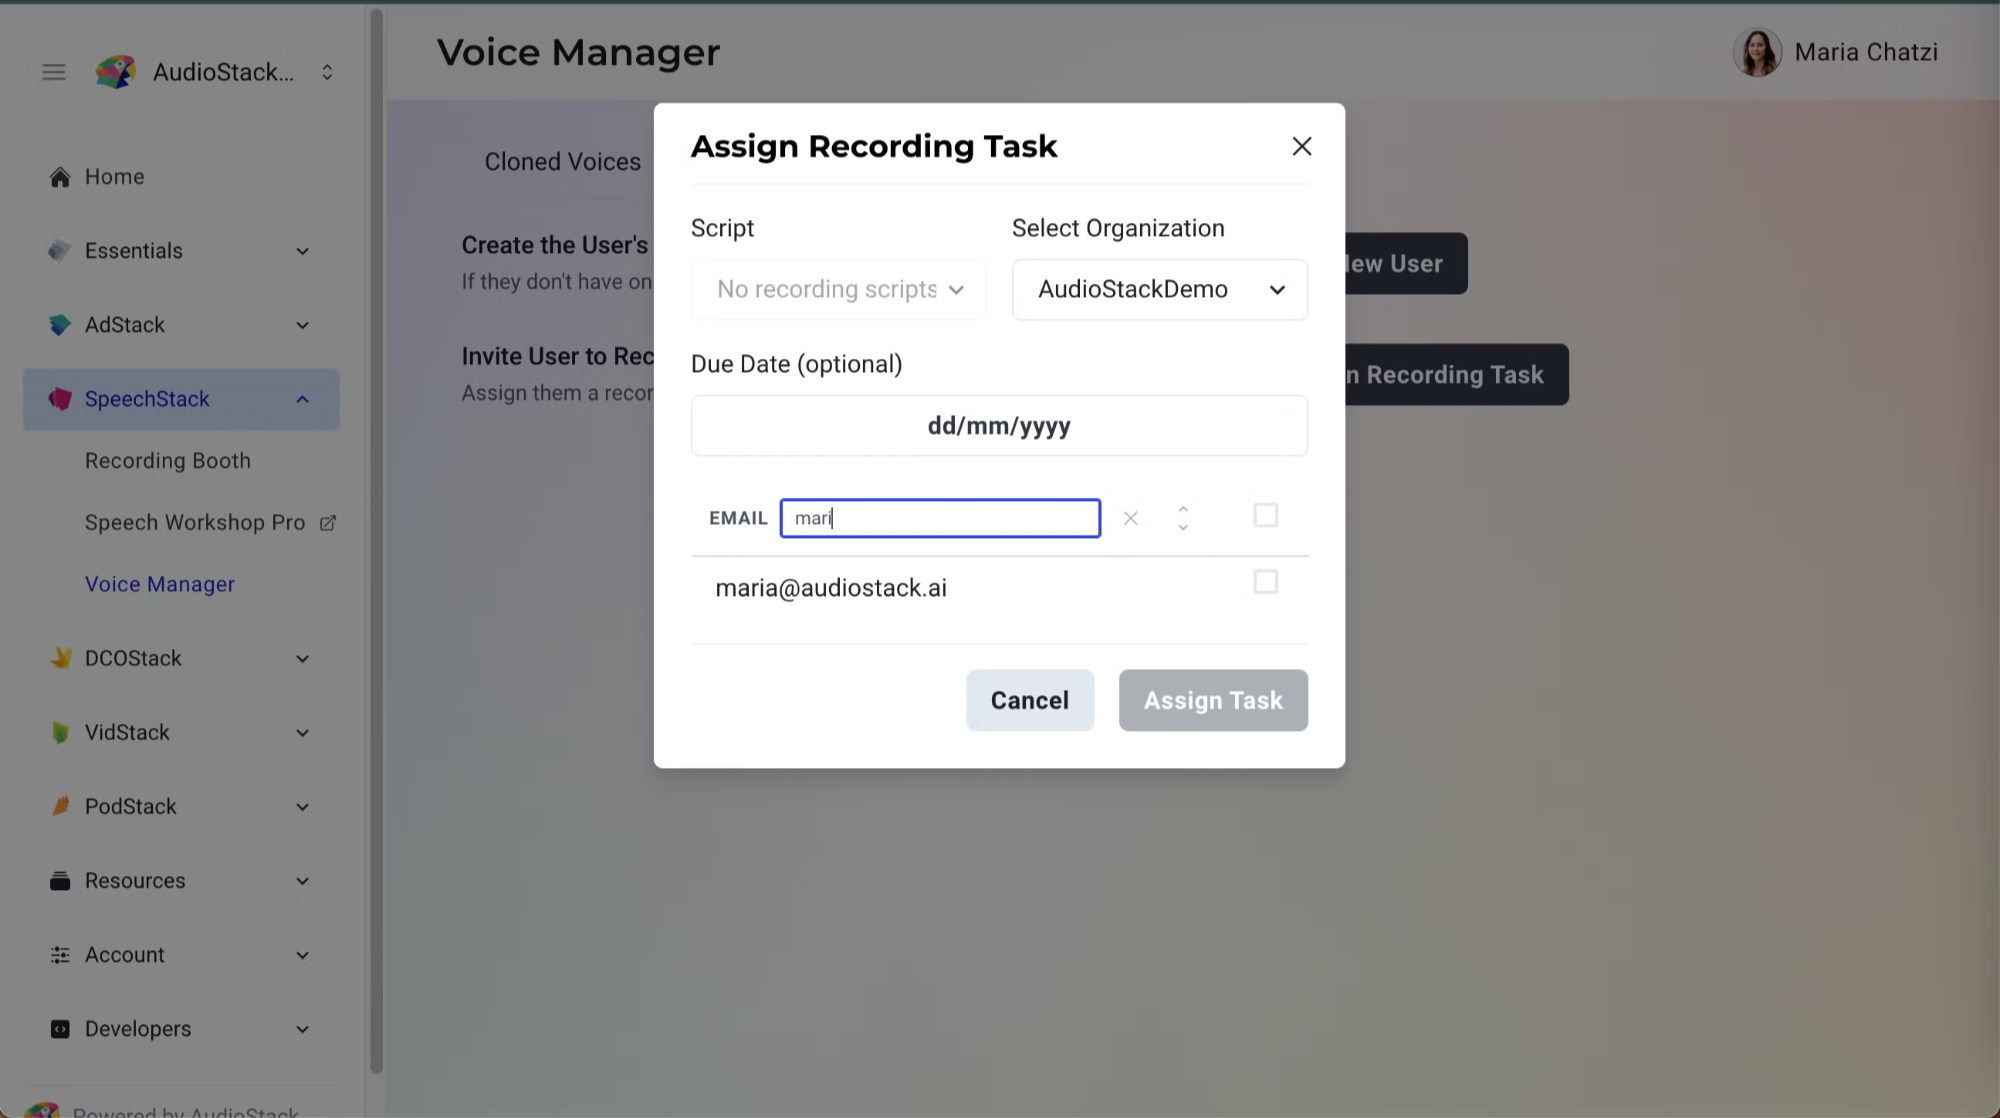
Then, to assign the recording task, you can select the script from the dropdown menu (will appear on the tasks). The script that will appear on the dropdown menu needs to be uploaded at the moment via our API, following these steps and then letting us the ScriptID know so we can make it available for recording .
It can be also done as a managed service, by sending us the desired script. You can choose the Organisation the recordings will be saved to, optionally choose a DueDate of the Task to be completed, and invite the external contractor with their email. Once done, click on Assign Task.

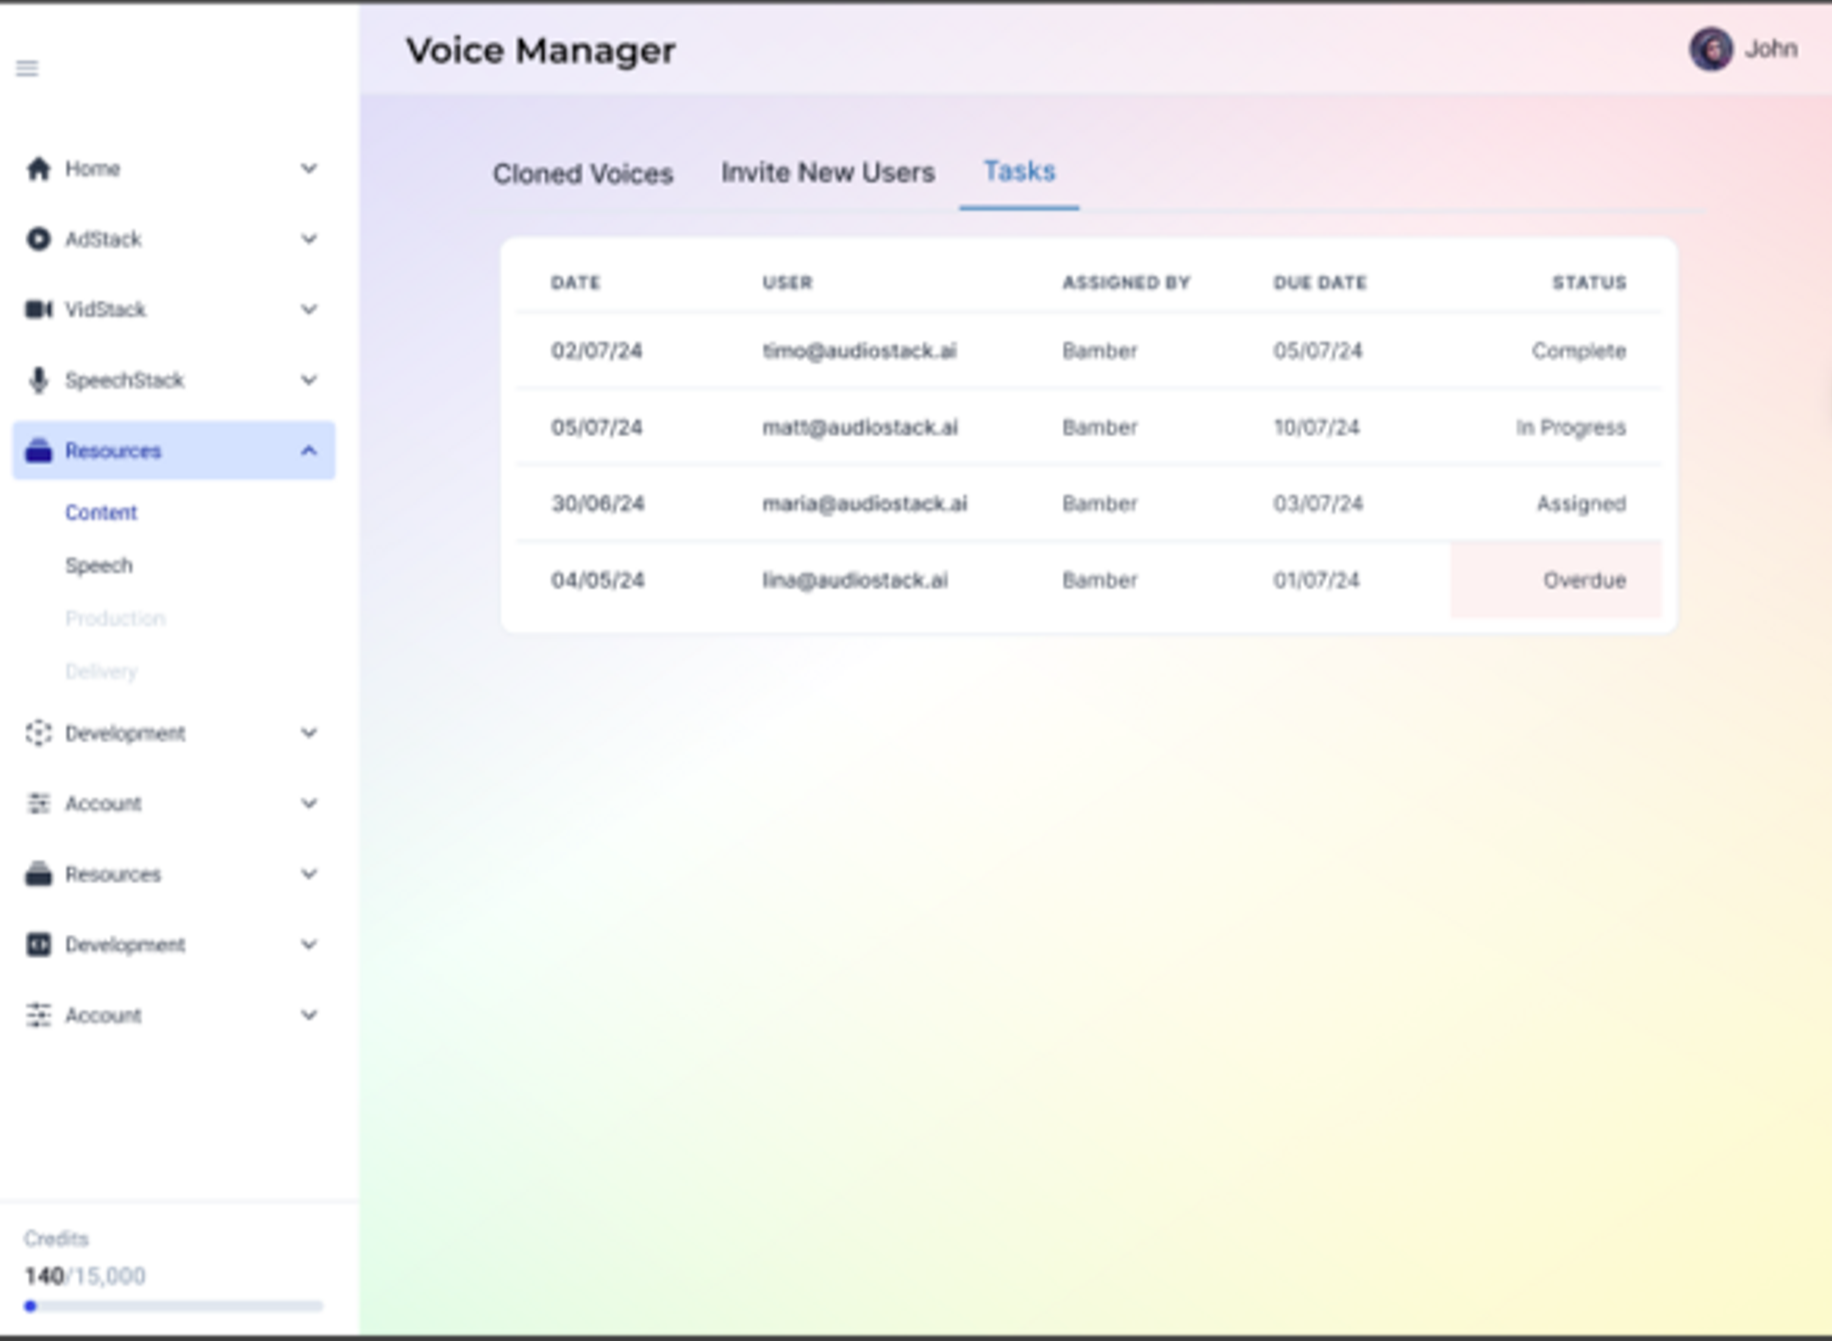
The progress of the recordings can be monitored in the Tasks Tab.

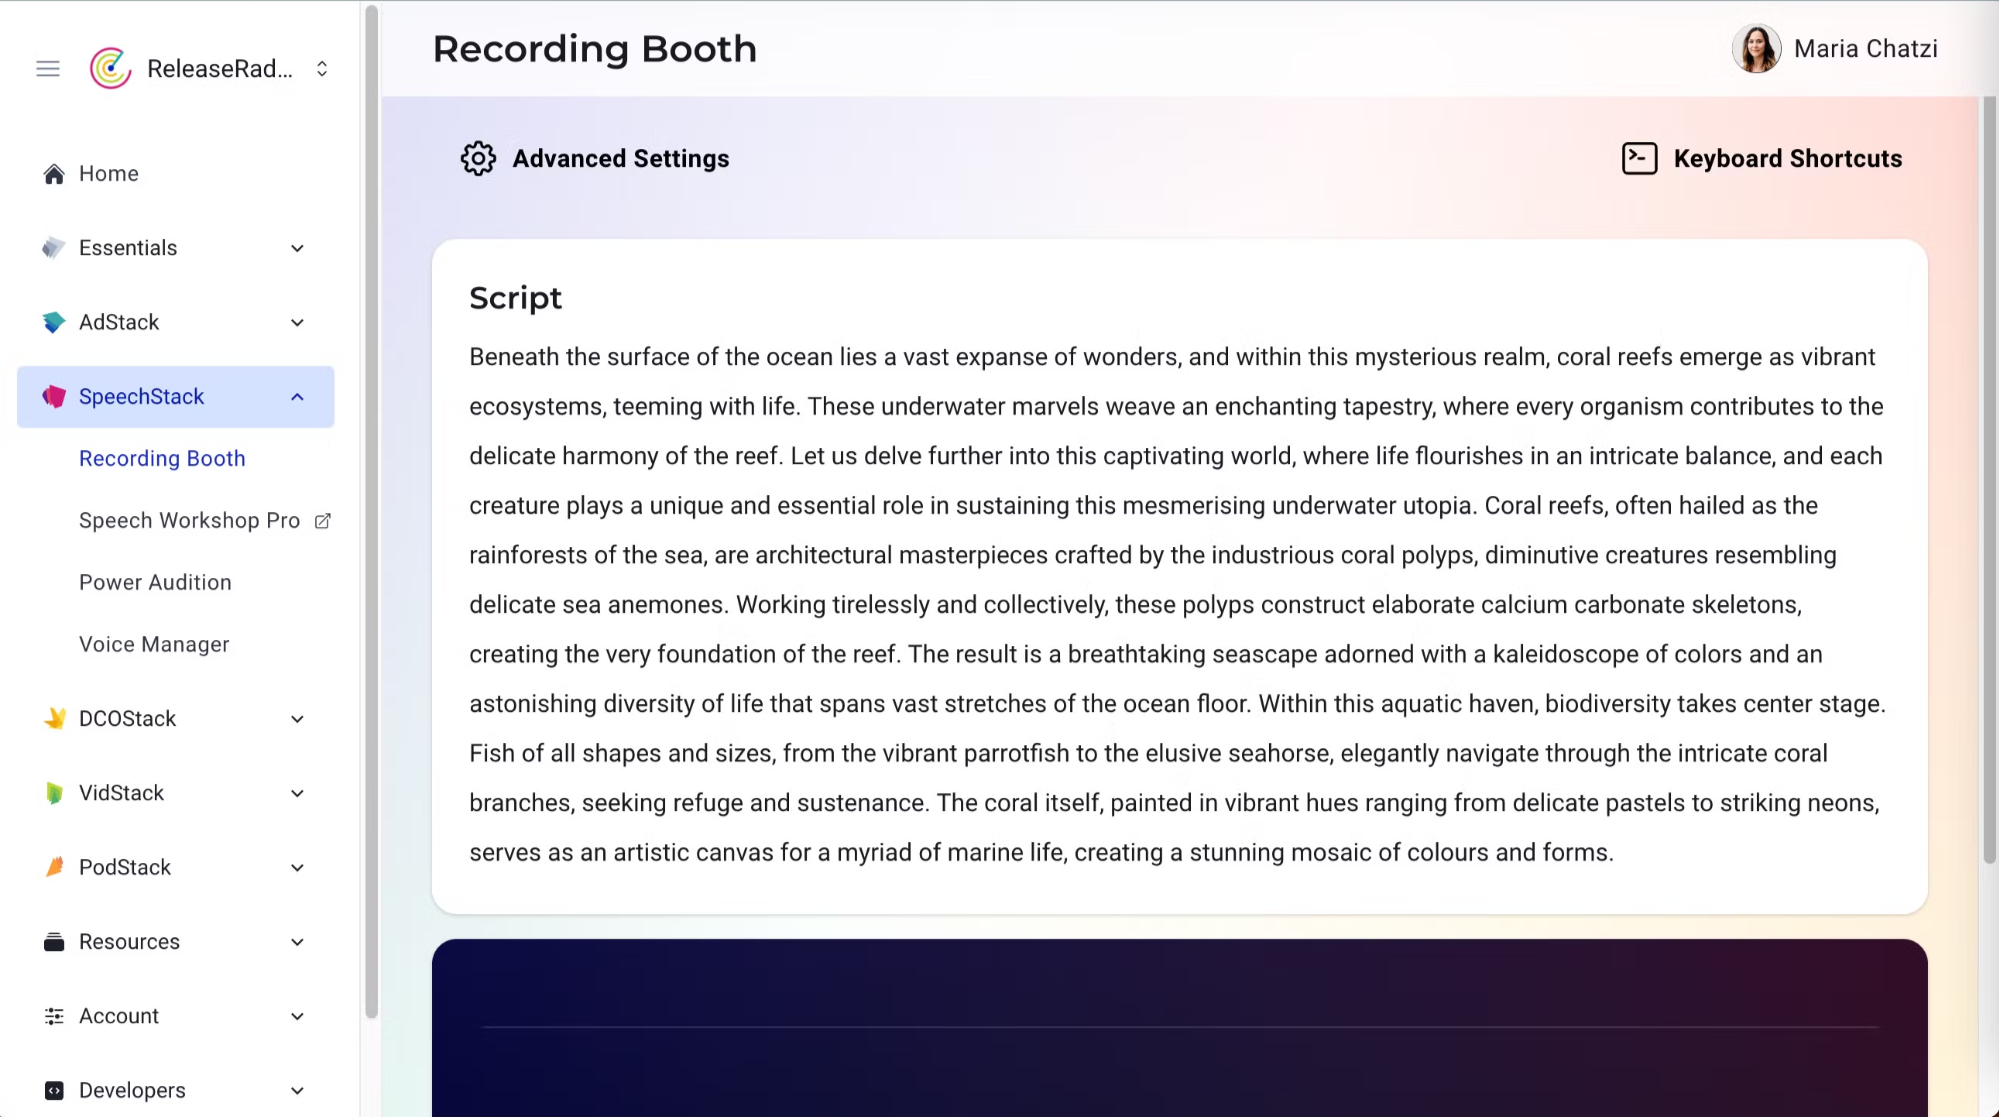
The external contractor will be taken to the our Recording Booth Workflow, where they will record section by section the script they will be assigned. They will be able to retake, delete and submit the preferred take before they move on to the next section.

Once they reach the end of the assigned script, the admin of the organisation from which the task was assigned will be able to access the recorded file in the filepath they specified when creating a task. The admin can also choose to denoise the files using our Denoiser to ensure that no artefacts or background noise is present in the recordings. Once this step is complete, the client notifies AudioStack and we take it from there-in a few days the voice you have recorded with the desired alias will appear on your organisation’s Private Voice list in the library.
🍽️ CONCIERGE SERVICE
Ιn order to create a clone, we also offer semi-concierge and full concierge service.
For semi-concierge, we waive the platform recording part of this process. It is fairly simple and the process is as follows:
-
Consent is signed and all relevant documentation is submitted
-
The external contractor/user whose voice will be cloned records in their environment, and collects the files in a wav. or .mp3 format.
-
The files are uploaded in the File Manager and are labelled accordingly.
-
If they haven't been denoised already, this can be done using our Denoiser.
-
Client notifies Audiostack, and in a few days the voice will appear in the organisation as a private voice.
Fully concierge is also possible, please contact your account manager to discuss pricing and service package.
❌ DELETE A VOICE ΑND RECORDING DATA
In order to delete the voice and recording data, a customer would need to get in touch with our customer success team at [email protected] and express their right to be forgotten.
Below you can find the steps required for this process:
-
User submits a voice or data deletion request via email to our Customer Success team. It needs to be in written format, including first name, last name, email, orgID and wherever possible, voice name to be deleted (alias).
-
AudioStack will identify all instances of the cloned voice across the platform (ie. active user profiles, archived or backed-up copies, associated metadata).
-
AudioStack will create a temporary backup of the cloned voice data for a specified period of 30 days. This step allows recovery in case the request was made in error. The backup is stored securely with restricted access and encryption. If there is an urgent deletion request, then the client should explicitly state in written format that they wish for their data not to be retained for 30 days but instead immediately deleted.
-
Once consent from the owner of the voice is withdrawn, AudioStack will delete voice and recording data within a 30 day period.
-
Deletion of ONLY voice: In this case, AudioStack will:
- Delete the cloned voice from all active locations, including databases, storage systems, and user org.
- Ensure that all copies, including those on third-party systems or local machines are permanently erased.
- Deletion of Cloned Voice AND Recordings: In this case, AudioStack will:
- Remove associated metadata that could be used to reconstruct or identify the cloned voice.
- Locate and delete the recordings from all backup systems and archives.
- Ensure that all copies, including those on third-party systems or local machines are permanently erased.
- Verification and Audit
- AudioStack will conduct a thorough check to ensure that all instances of the cloned voice have been deleted.
- AudioStack will record the deletion process in a log, including timestamps, locations of deleted data, and the identity of the AudioStack employee who performed the deletion.
- Confirmation
- AudioStack will notify the user or requester that the cloned voice has been successfully deleted and provide them with a report detailing the actions taken.
Existing assetsFor assets that have already been created with the synthetic voice in question, the deletion request will not retroactively affect assets that were generated prior to the data deletion. Those assets are likely to remain in existence and the user would have to remove them individually.
How to clone a voice
Create your voice in two steps.
First, make a POST request to https://v2.api.audio/speech/voice-cloning with the following payload:
{
  "fileIds": ["file_id1", "file_id2", "file_id3"],
  "alias": "my-instant-clone",
  "engine": "voice_engine_3",
  "metadata": {
    "gender": "female"
  }
}
If the files are correct and the alias is globally unique, you will receive a response with a status code of 202, meaning your voice is being created.
Then, make a GET request to https://v2.api.audio/speech/voice-cloning?alias=my-instant-clone to check the status of your voice. If the status is succeeded, that means your voice is ready to be used in AudioStack!
You'll notice that a state contains a discardedFiles field. This field will contain the IDs of the files that were not used in the voice cloning process. You'll also see the reason for their discard.
Engine Details
| voice_engine_3 (Instant) | voice_engine_3 (Professional) | |
|---|---|---|
| Max. files amount | 25 | 100 |
| Min. single file duration | 1.5 seconds | 10 mins |
| Min. total audio duration | 1.5 seconds | 30 mins |
| Max. total file size | 10MB | 1500MB |
| SSML support | No | No |
| multilingual | Yes | Yes |
| Avg. synthesis latency for 500 characters | 20 seconds |
Updated about 2 months ago
